In native iOS development, we use UIViewController as a primary unit to display content on our screens. UIKit comes built with UINavigationController and UITabBarController to compose our screens but sometimes, one screen might just be too complex for a single UIViewController.
When it comes to creating a rich user interface, you often need a way to swap screens rapidly. Let’s say you want a unified loading and error experience across your app. If a content is repeated in different places of your application, it is probably a good candidate for extracting it as its own component.
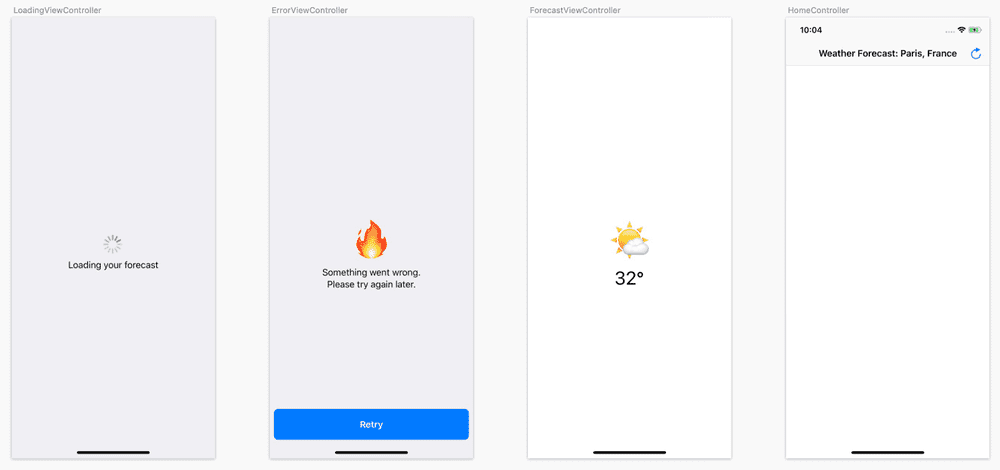
Let’s create a Weather App as an example: It will display Weather and Temperature for a location and present a loading and error screen if something goes wrong.
Preparing the screens
It’s always a good idea to break a big job into smaller tasks. To do this we will implement three screens that represent each state of presenting a forecast. These screens are themselves encapsulated inside a container that presents a navigation bar.
As the focus of this post is around presentation, you won't be able to configure a city and we will just simulate network requests with timers and random results.
Combining controllers
In order to compose UIViewController, you can arrange them in a hierarchy, just like you would with UIView. You only have to call extra callbacks from UIKit to inform it that it should broadcast important messages (rotation, status bar changes, appearance changes…) to your child UIViewController.
Here is an example from Apple:
let child = UIViewController()

// == Adding a child
// Add the child view as a subview
view.addSubview(child.view)

// Tell UIKit that you now have a child
addChild(child)

// Tell the child it is now contained
child.didMove(toParent: parent)

// == Removing a child
// Tell the child it is not contained anymore
child.willMove(toParent: nil)

// Tell UIKit that we don't have a child anymore
child.removeFromParent()

// Remove the child from the view hierarchy
child.view.removeFromSuperview()
In our example, depending on the state of the app, our HomeController has to present and remove successively:
- The loading controller
- The error controller
- The forecast controller
To represent these states we create the following enum:
enum State {
    case loading
    case error
    case loaded(weather: String, temperature: Int)
}
Dealing with the UIKit callbacks and the presentation code can be tedious, this is why internally we created MultiplexerController.
MultiplexerController
This container controller is initialised with a state and later on, updated with a variation on that state. The multiplexer then pushes the new value to you, requesting for a new UIViewController to present. Then it deals with the presentation, animation and memory management of the controller you just passed.
If you switch state too quickly for the animation to complete, the multiplexer handles it gracefully without any weird behaviour which can be quite complicated to implement yourself.
So how do we implement this library in our app?
The first step is to add it as a child of our home controller and pass it a loading state.
let multiplexer = MultiplexerController(initialState: State.loading)
multiplexer.setDataSource(self)

view.addSubview(multiplexer.view)
multiplexer.view.translatesAutoresizingMaskIntoConstraints = false
NSLayoutConstraint.activate([
    multiplexer.view.topAnchor.constraint(equalTo: view.topAnchor),
    multiplexer.view.leftAnchor.constraint(equalTo: view.leftAnchor),
    multiplexer.view.rightAnchor.constraint(equalTo: view.rightAnchor),
    multiplexer.view.bottomAnchor.constraint(equalTo: view.bottomAnchor)
])

addChild(multiplexer)
multiplexer.didMove(toParent: self)
Although we have to insert it as a child ourselves, the multiplexer will handle its children on its own.
Next we need to implement the HomeController as the data source for the multiplexer controller. This is how you will pass to the multiplexer your controllers as function of the state. Try as much as possible to make your ViewController immutable entities.
This will improve the reusability of your views and make your code simpler as you only represent one state at a time and don’t try to handle its change.
extension HomeController: MultiplexerControllerDataSource {
    func controller(for controller: MultiplexerController<State>, inState state: State) -> UIViewController {
        switch state {
        case .loading:
            return LoadingViewController()
        case .error:
            return ErrorViewController()
        case .loaded(weather: let weather, temperature: let temperature):
            return ForecastViewController(weather, temperature: temperature)
        }
    }
}
Now you can change the state of your multiplexer whenever you want and the declarative nature of the dataSource implementation makes the result a lot more predictable. You can even animate the change if you want to obtain a nice fade.
Going further
You’ll find more informations about MultiplexerController on Github. If you have any idea to improve the project, feel free to open an issue and discuss it with us.
You can also find the code examples for this article in this repository.


